


How to set up the prepayment add-on
In this article
This support article explains how to set up the prepayment add-on so that you can start taking prepayments/deposits when guests book a table at your restaurant. This feature setup is super easy and there are just a few steps that you have to take. The following guide will illustrate what the add-on looks like from a guest’s view, as well as from a restaurant’s view.
Before you start
Prepayments need an active paid plan and the Online payment add-on connected to Stripe. Online payment cannot be activated on the Free plan, so prepayments cannot be taken on it either. Which paid tier you are on does not matter, any of them will do. On the pricing page, prepayments and no-show fees both sit in the Online payments add-on, and its subscription is included in the Annual All-Access bundle. On other paid plans, it costs extra. Resos transaction fees and Stripe processing fees also apply, including on All-Access. See transaction fees explained. Step 1 below is the Online payment activation, so start there if you have not connected Stripe yet.
How to activate the prepayment add-on
To activate the prepayment feature at your restaurant, follow these steps:
- Go to Menu → Settings & add-ons → Payment → Online payment and activate the add-on.
- Set up your Stripe account by completing the onboarding steps Resos provides. This creates a new Stripe account for your restaurant; you cannot connect an existing Stripe account. If you already use Stripe elsewhere, you still complete this onboarding once for your Resos profile. Stripe is the payment gateway used by Resos, and you use it for payouts, payment details, and account verification. Guests are normally refunded from the booking in Resos, and a few cases have to be refunded from the Stripe dashboard instead. See refunds and payment problems on a booking.
- Go to Menu → Settings & add-ons → Payment and enable Prepayment.
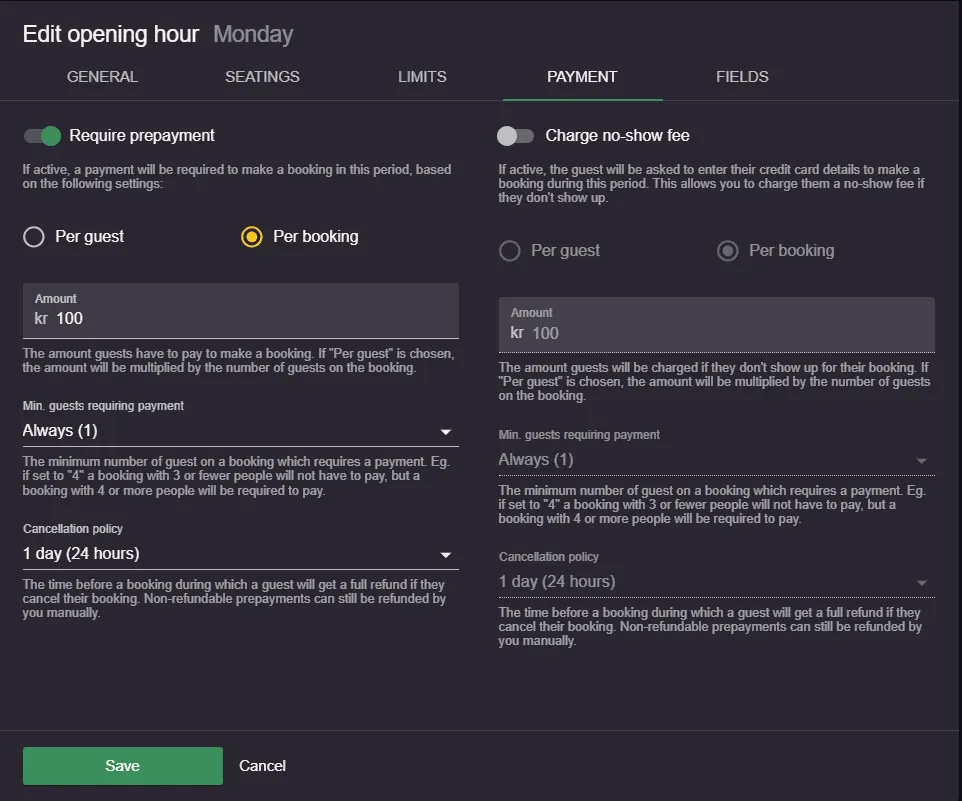
- Go to Menu → Settings & add-ons → General → Opening hours → Payment to choose the opening hour to enable this feature for. You can activate the add-on for specific opening hours when you are at your busiest, and not activate it for the rest of the opening hours.
- Choose the prepayment amount, if you want to require it per booking or per guest, the minimum number of guests and the cancellation policy that suits your restaurant best. The amount is what the guest pays in total: tax is not added on top, so if you charge VAT, include it in the amount. The VAT percentage under Online payment only records the VAT share contained in the amount against the booking, for your own accounting.
A fixed fee or an amount per guest
The Payment tab gives you two ways to charge:
- Per booking charges the same fixed amount whatever the party size.
- Per guest multiplies the amount by the number of guests on the booking.
Every guest counts the same. There is no separate price for children or other guest types, so an amount per guest is charged in full for every person on the booking. Min. guests requiring payment sets the smallest party that has to pay: smaller bookings are not asked for a prepayment at all.
Payment time
Once the prepayment feature is activated (for the opening hours you selected) guests must pay a prepayment amount when booking a table within a customized time frame. You can choose the payment time that works for you and your guests by going to Menu → Settings & add-ons → Payment → Online payment → Payment completion time.
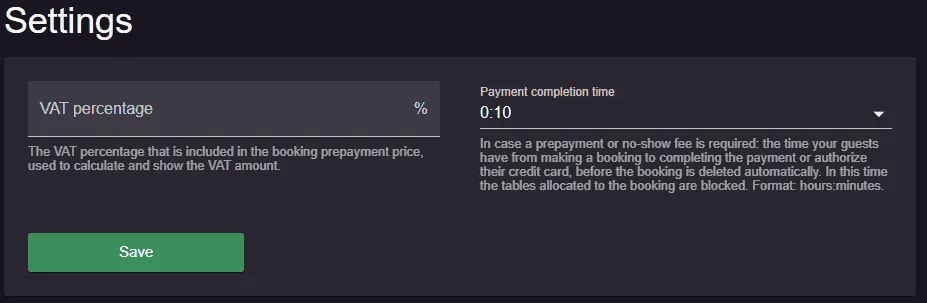
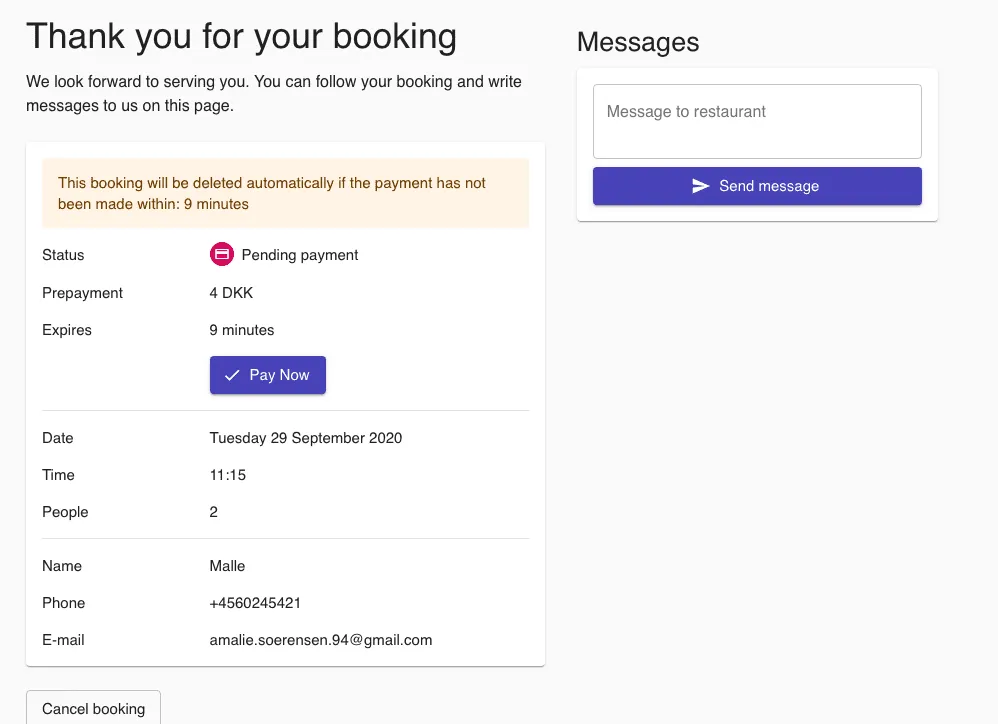
While that time is running, the guest can leave the payment step and come back to it. Resos reopens the same payment instead of starting a second booking, and the guest sees a countdown on their booking page. If the payment is not completed before the deadline, the booking is removed automatically and a note on the booking tells the guest to book again. The guest is not emailed or texted about the deadline. To rebook, the guest goes through the booking flow again and pays in time.
Check the status of the prepayment
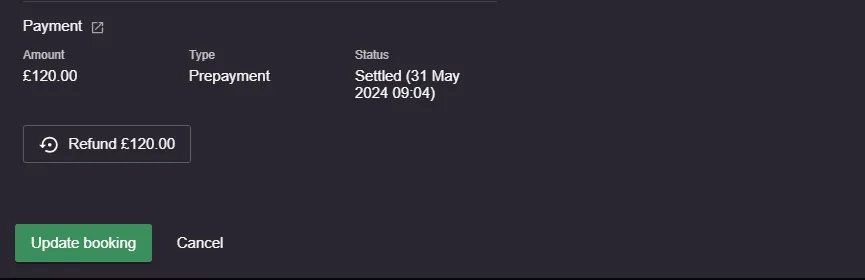
Sometimes a guest interrupts the payment part way through. That does not cancel the booking on its own: the payment stays pending, and the guest can go back and finish it until the payment completion time runs out. Only then is the booking removed automatically. You can always check if the prepayment is settled or if it is pending by going to Menu → Calendar, finding the specific booking, and checking the status of the payment.
Guests are not asked to pay
If Stripe looks fine but guests can still book without paying, one of these is missing. A guest is only asked for a prepayment when all of them are true:
- Online payment is active and the Stripe setup is complete. If Stripe has not finished, the Payment tab of your opening hour shows a Resume Stripe setup button. See Stripe looks complete but Resos does not accept payments.
- The Prepayment add-on is active under Menu → Settings & add-ons → Payment. Without it, the Require prepayment switch on the opening hour is grayed out. If there is no Payment section there at all, see how to enable the online payment add-on for why.
- Require prepayment is switched on, with an amount above zero, on the Payment tab of the opening hour the guest books in. Every opening hour has its own setting, including special opening hours that are set to Open, so check each one you take bookings in.
- The party is at least as large as Min. guests requiring payment on that opening hour.
Guests who join the waitlist and guests who book through Reserve with Google are not asked to pay.
To see what a guest sees, open your own booking page and pick a date and party size covered by the opening hour. The prepayment notice appears before the booking is submitted, so you can check it without completing a booking.
Manual bookings
You can ask for a prepayment on a booking you add yourself as well, from the phone, an email or a walk-in. That works differently from the opening-hour setup above: you type the amount on the booking, and the booking has no payment deadline, so it waits for the guest instead of being deleted. See prepayments and no-show fees on manual bookings.
Settling a prepayment as a guest
When requiring a prepayment for table bookings, a notice will show up on the last step of the booking page based on your settings. The notice clarifies that a prepayment is required. At the end of the booking flow, the guest must settle the payment within the chosen time, or else the booking is removed automatically. Once settled, simply lean back and enjoy reducing no-shows, as well as maximizing the capacity of the restaurant.
Changing the wording of the prepayment notice
The standard notice is built from your settings: the amount, whether it is per guest, and the cancellation deadline. With the custom design add-on you can replace it with your own. The fields only appear once the Prepayment add-on is active and Stripe is connected.
- Go to Menu → Settings & add-ons → General → Design → Texts and pick the Language.
- Under Payment Headlines, fill in Prepayment headline and Prepayment description. Insert {deposit} where the amount should appear. With Per guest, that is the amount per guest.
- Click Save & Publish.
Your description replaces the whole standard text, including the cancellation deadline, so write the deadline into it yourself. A field left empty shows the standard text, and each language has its own text, so fill it in for every language your guests book in.
See it in action
This short video covers the full online payment setup, from connecting Stripe to switching on prepayments and no-show fees:
Read also about how you can minimize no-shows with fees and flagging bad guests. 
What this article does not cover
This article is the setup. A few things it does not decide for you.
Whether a payment goes through. Stripe and the guest’s bank do. If a payment fails or is interrupted, the guest can return to the payment step and try again before the payment completion deadline. If payment is not completed before the deadline, the booking is removed automatically and the guest must book again.
Which services ask for it. A prepayment on one service and nothing on another is set per opening hour. See set a different deposit for each service.
Refunds. Normally, refund a prepayment from the booking in Resos. Some cases require a refund through the Stripe dashboard, including bookings more than 30 days in the past and payments taken through a disconnected Stripe account. See refunds and payment problems on a booking for the full process and the exceptions.
Anything inside Stripe. Payouts, account verification and disputes are handled in your own Stripe account.
An invoice for the guest’s payment. A prepayment is a Stripe payment, not a Resos invoice. Resos does not produce an invoice or a tax receipt for it, and it does not appear under Menu → Settings & add-ons → Account → Billing → Invoices, which lists your own Resos subscription invoices only. When the booking has a valid guest email address, Resos asks Stripe to send a payment receipt after a successful charge, even if automatic receipt emails are disabled in Stripe. This receipt is not an invoice issued by Resos. The payment record itself sits in that same Stripe account: open it with the My Stripe Dashboard button under Menu → Settings & add-ons → Payment → Online payment. If your accounting needs a formal invoice for the prepayment, you issue it yourself. See how to set up Stripe.
Two limits cannot be worked around in the settings. An opening hour holds one payment type at a time, so it can ask for a prepayment or a no-show fee, never both. And Reserve with Google does not support either payment type: guests can still book through Google, but they will not be charged, see the Reserve with Google FAQ.
If a prepayment did not arrive, or you are unsure which opening hours it is live on, write to us at hi@resos.com with the date and the booking and we will check it with you.


