


How to set up the no-show fees add-on
In this article
- How to activate the no-show fees add-on
- Payment completion time
- Status of the no-show
- When the fee is charged, and when it is not
- There is no grace period
- A booking made before you switched the fee on
- When a booking is cancelled late
- Charging only part of the fee
- Undoing a no-show
- Charging the fee only on certain days or dates
- Only on certain weekdays
- Only on a single date, such as a holiday or an event
- Only for a specific area
- Only for larger parties
- Cancellation policy
- Why the fee notice repeats on the booking page
- Changing the wording of the fee notice
- Manual bookings
- How the no-show fees add-on works for your guests
- See it in action
- What this article does not cover
In this article, you can find all the steps needed to activate the no-show fees add-on, as well as other relevant details regarding it. Unfortunately, many restaurants experience no-shows and lose revenue as a result. Our booking system can help with that. Review how the restaurant no-show fee policy works before following the setup steps below, and check the Resos No-Show Index if you want to see which services carry the most risk: the recorded rate runs 43% higher at dinner than at lunch, and January is the worst month of the year.
Before you start
No-show fees need an active paid plan and the Online payment add-on connected to Stripe. Online payment cannot be activated on the Free plan, so no-show fees cannot be charged on it either. Which paid tier you are on does not matter, any of them will do. On the pricing page, no-show fees and prepayments both sit in the Online payments add-on, and its subscription is included in the Annual All-Access bundle. On other paid plans, it costs extra. Resos transaction fees and Stripe processing fees also apply, including on All-Access. See transaction fees explained.
Step 1 below is the Online payment activation, so start there if you have not connected Stripe yet.
How to activate the no-show fees add-on
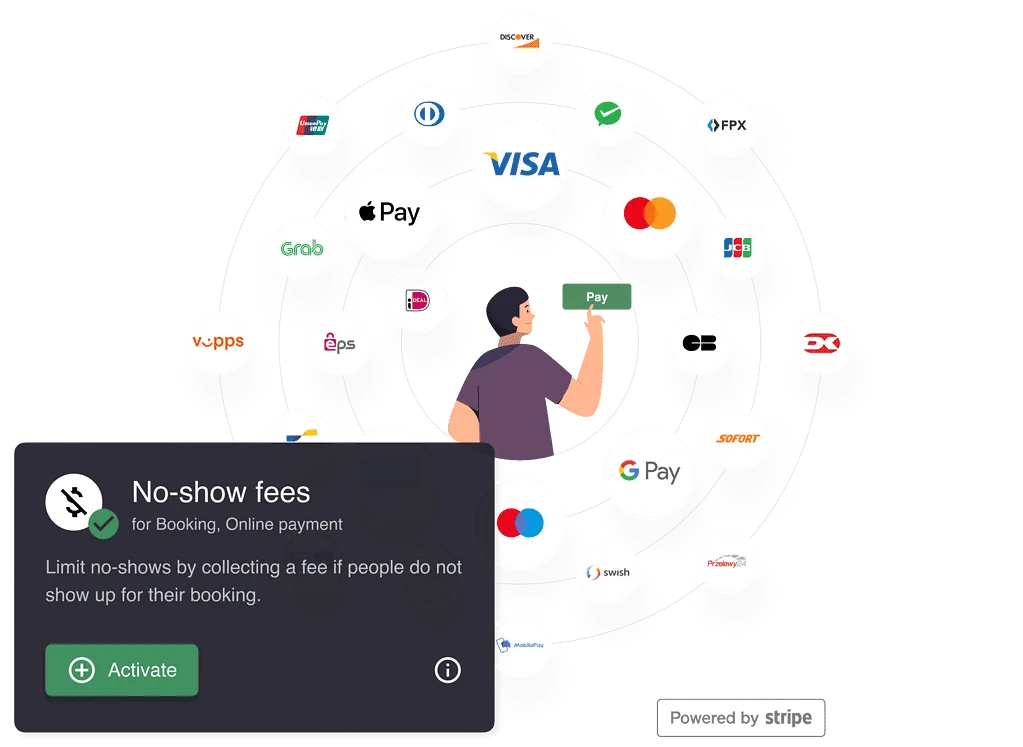
To activate the no-show fees feature on your Resos profile, you can follow these steps:
- Go to Menu → Settings & add-ons → Payment → Online payment and activate this add-on first.
- Complete the Stripe setup. Stripe is our payment gateway, and the only one no-show fees work with: there is no option to use another payment provider. Stripe is where you manage the fees collected from your guests, along with payouts. The setup creates a Stripe account for your restaurant, so you go through it even if you already use Stripe elsewhere.
- Go to Menu → Settings & add-ons → Payment and enable No-show fees.
- Go to Menu → Settings & add-ons → General → Opening hours, open the opening hour you want the fee on, go to its Payment tab, and switch on Charge no-show fee. This can be enabled for all the opening hours and special opening hours, or only for some.
- Choose the amount the system should charge your guests, if it should be charged per booking or per guest, the minimum number of guests, and the cancellation policy that suits your establishment. The amount is what the guest is charged in total: tax is not added on top, so if you charge VAT, include it in the amount. The VAT percentage under Online payment only records the VAT share for your own accounting.
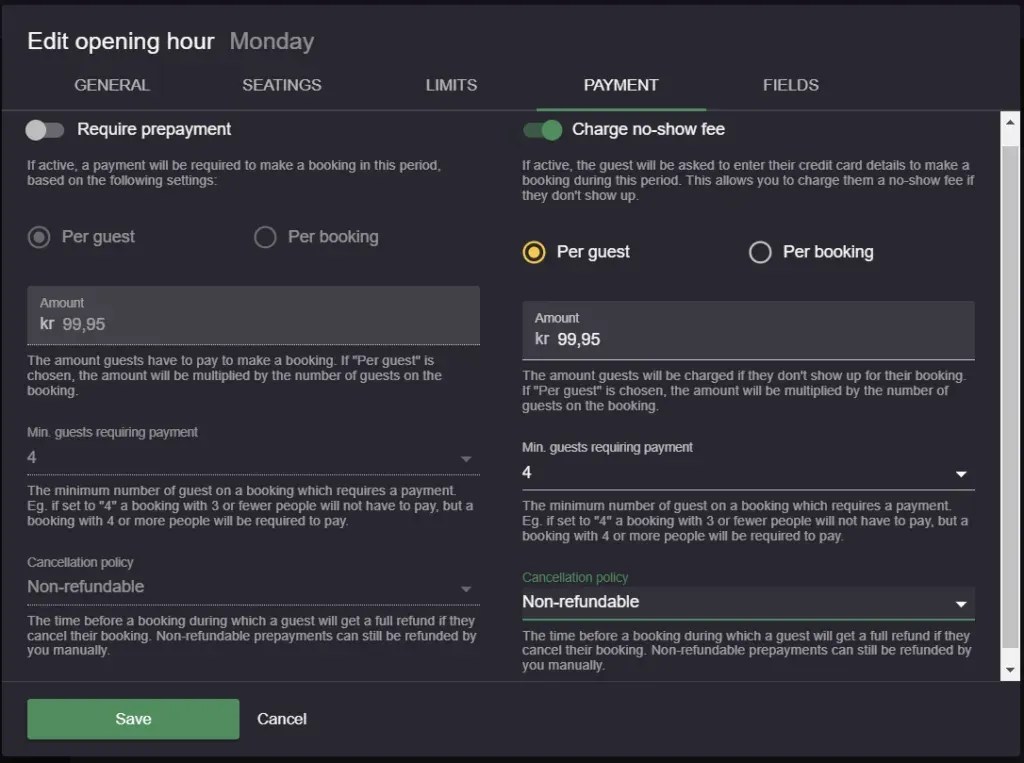
The fee lives on the opening hour, not on your restaurant as a whole. There is no single restaurant-wide no-show fee to switch on, and that is what lets you charge on some services and not others. Each opening hour also holds one payment type at a time, so a given opening hour can require either a prepayment or a no-show fee, never both.
Payment completion time
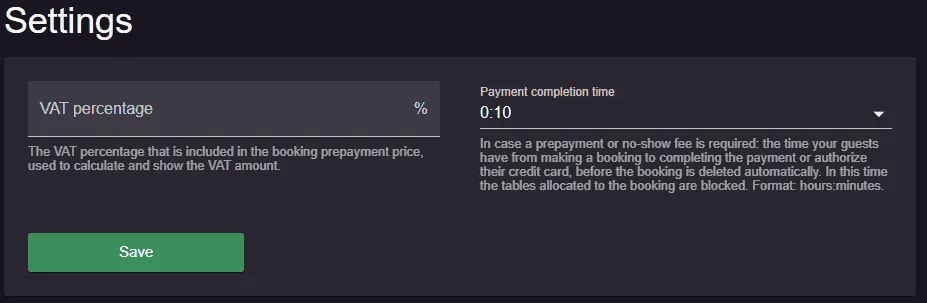
Once you’ve activated the no-show fees add-on for the opening hours and special opening hours needed, your guests will have to insert their payment details on the last step of the online booking flow in order for the booking to be confirmed and completed. With Resos, you can customize this time frame by going to Menu → Settings & add-ons → Payment → Online payment → Payment completion time.
Status of the no-show
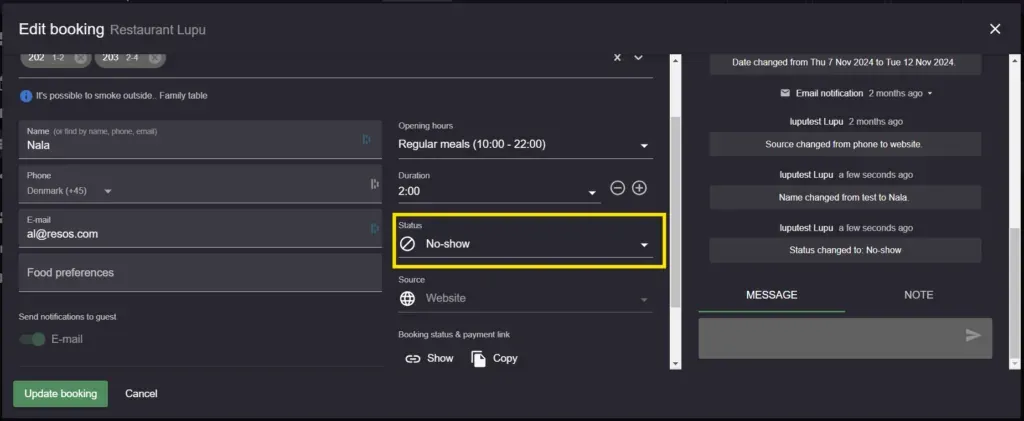
Perhaps you’re wondering how the system charges the no-show fees. Stripe stores your guests’ payment information, and Resos charges the no-show fee when the booking status is set to “No-show”, or when a booking is cancelled later than your cancellation policy allows (see when the fee is charged, and when it is not). In order to change the booking status, you’ll have to go to Menu → Pick one of the booking views → Click on the specific booking → Booking status → No-show.
The system will then try to charge the fee that you previously chose, and you’ll be able to see the status of the transaction both on your Stripe profile, as well as on your Resos profile on the booking itself.
When the fee is charged, and when it is not
There is no grace period
Resos never marks a booking as a no-show by itself. Apart from a late cancellation (see below), the fee is charged only when the booking’s status is set to No-show, by your team or by a system you have connected through the Resos API, and it is charged as soon as that status is saved. When you pick No-show from the booking’s status menu, a Change status to no-show? window first shows the amount and asks you to confirm with Change status.
There is no time limit for setting the status, so you can do it after the service. Until you do, nothing is charged. To let a guest off, do not set No-show: give the booking another status instead. If you choose Cancelled, pick Don’t charge when Resos asks, see the next sections.
A booking made before you switched the fee on
The fee can only be charged on a booking where the guest saved their card while booking. A booking made before you switched on Charge no-show fee for its opening hour has no card on it, and neither does a booking below the Min. guests requiring payment threshold. Setting such a booking to No-show changes the status and charges nothing. Resos cannot charge a fee afterwards on a booking without a saved card.
To ask for a card on a booking that does not have one, add a no-show fee to the booking and send the guest the payment link, see prepayments and no-show fees on manual bookings. The guest has to complete that step themselves.
When a booking is cancelled late
What happens depends on who cancels:
- The guest cancels later than your cancellation policy allows. The fee is charged automatically, usually within a minute, and a note on the booking says so.
- You cancel, decline or delete the booking after the cancellation deadline has passed. A Charge the customer? window asks what to do. Charge customer charges the fee, and Don’t charge cancels the booking without charging it.
If you picked Don’t charge on a cancelled or declined booking and change your mind, open it and set it to No-show. The card is still saved, so the fee is charged then.
With the cancellation policy set to Always full refund or Non-refundable, a cancellation made before the booking time never charges the fee. The fee is then only charged when you set No-show. That matches what your guests are told on the booking page: with Non-refundable, the fee applies “if you don’t show up”.
Charging only part of the fee
The fee is a fixed amount saved on the booking when the guest books. With Per guest, it is the amount per guest times the number of guests at that moment. It does not change if you edit the party size later, and you cannot edit the amount once the guest has saved their card. Setting No-show always charges that full amount.
There is no option to charge for some of the guests only, for example two of a party of four. If you want to collect less, set No-show and then refund the difference with the Refund button on the booking, which accepts a partial amount. See refunds and payment problems on a booking.
Undoing a no-show
You can change the status of a no-show booking back to any other status. That does not refund the fee, because it was charged when you set No-show. To give the money back, use the Refund button on the booking, see refunds and payment problems on a booking.
Setting No-show also flags the guest automatically. Changing the status back does not remove the flag. If you use the Flag guests add-on, remove the flag yourself from the guest’s customer profile, see the no-show add-ons.
Charging the fee only on certain days or dates
Because the fee is configured on each opening hour, you decide service by service where it applies. Lunch can stay open and casual while Friday and Saturday dinner asks for a card. Here is how each variant works.
Only on certain weekdays
Each weekday is its own opening hour, and a single opening hour covers one day only. So to charge on Fridays and Saturdays and nowhere else, you edit those two opening hours and leave the rest untouched:
- Go to Menu → Settings & add-ons → General → Opening hours and stay on the Regular tab.
- Open your Friday opening hour, go to the Payment tab, and switch on Charge no-show fee. Set the amount, whether it is per booking or per guest, the minimum guests, and the cancellation policy.
- Save, then repeat for Saturday.
Guests booking any other day go through the normal booking flow with no card requested. If a day is split into more than one opening hour, remember to repeat the setup on each one you want covered, for example both Friday lunch and Friday dinner.
Only on a single date, such as a holiday or an event
For a one-off date, use a special opening hour instead. Special opening hours are tied to specific dates and by default they override the regular hours for those dates, so they are the right tool for bank holidays, New Year’s Eve, or a one-night event. See how to set up default and special opening hours if you have not created one before.
- Go to Menu → Settings & add-ons → General → Opening hours and switch to the Special tab.
- Click Add special hours and set the date and times for that day.
- Go to the Payment tab of that special opening hour and switch on Charge no-show fee, then set the amount and cancellation policy.
One thing to watch: a special opening hour that replaces the day carries its own payment settings and does not inherit anything from your regular hours. If you create a special opening hour for a busy date and forget the Payment tab, that date ends up with no fee even though the same weekday normally charges one. The reverse is also useful. If you normally charge on Saturdays but want one particular Saturday to be free, a special opening hour without a no-show fee is how you make that exception.
Only for a specific area
An opening hour can be limited to specific areas instead of all of them, and a no-show fee follows that same scoping. If you configure the fee on an opening hour that only covers, say, the terrace, it applies to bookings in that area alone, not to the rest of the restaurant during the same hours.
Only for larger parties
If the concern is big tables rather than particular days, use the party-size threshold instead of, or on top of, the day settings. On the Payment tab, Min. guests requiring payment sets the smallest booking that has to pay. Set it to 6 and a table of five books normally while a table of six is asked for a card. The lowest value is shown as “Always (1)”, which charges every booking regardless of size.
Cancellation policy
The Cancellation policy setting on the same tab decides how late a guest can cancel and still avoid the fee. The options run from “Always full refund” through a range of hours and days up to two weeks ahead, plus “Non-refundable”. Set it per opening hour, so a high-demand Saturday can ask for more notice than a quiet Tuesday. What a late cancellation then does is described under when a booking is cancelled late.
Why the fee notice repeats on the booking page
On the booking page, the no-show notice sits above each opening hour’s block of times, and it uses that block’s own settings. A day split into several opening hours therefore shows the notice several times, once per block.
That is working as intended, not a fault, but it does look repetitive. If you would rather guests saw the policy once per service, consolidate the day into fewer opening hours, for example one for lunch and one for dinner. Your bookable time slots do not change, because the slot interval is controlled inside the opening hour itself rather than by having many short opening hours.
Changing the wording of the fee notice
The notice cannot be hidden while the fee is on. Every opening hour with Charge no-show fee switched on shows it to parties at or above Min. guests requiring payment, and the only way to remove it is to switch the fee off for that opening hour.
You can change its wording, though. The notice period itself is always the Cancellation policy setting above, picked from its list. The standard text is built from your settings: the amount, whether it is per guest, and the cancellation deadline. With the custom design add-on you can replace it with your own:
- Go to Menu → Settings & add-ons → General → Design → Texts and pick the Language.
- Under Payment Headlines, fill in No-show fee headline and No-show fee description. Insert {deposit} where the fee amount should appear. With Per guest, that is the amount per guest.
- Click Save & Publish.
Your description replaces the whole standard text, including the cancellation deadline, so write the deadline into it yourself. A field left empty shows the standard text, and each language has its own text, so fill it in for every language your guests book in.
Guests also accept your booking terms before they book, and the standard terms include a line about refunds when a booking has a payment. To use your own wording there, see custom terms and conditions.
Manual bookings
You can ask for a no-show fee on a booking you add yourself as well, from the phone, an email or a walk-in. That works differently from the opening-hour setup above: you type the amount on the booking and there is no payment deadline. See prepayments and no-show fees on manual bookings.
How the no-show fees add-on works for your guests
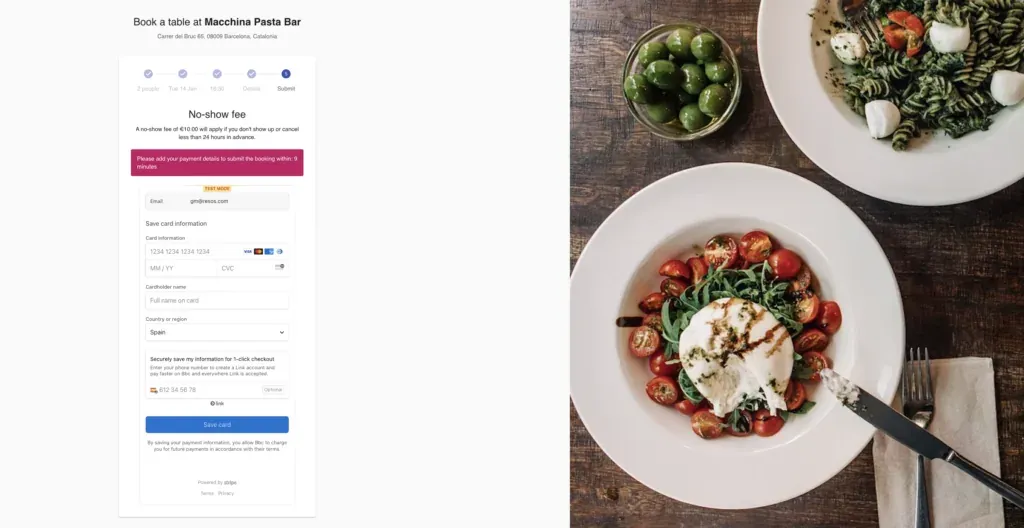
When requiring a no-show fee from your guests, the last step of the online booking flow will display the needed fields provided by Stripe for the guests to introduce their payment information. If the payment information is not added before the payment completion time runs out, the booking is removed automatically and the guest has to book again. Until that deadline passes, the guest can go back to the payment step and finish it. A booking you add yourself is not deleted on a deadline, it simply waits for the guest to pay.
Note: Refund a no-show fee from the Refund button on the booking in Resos, not from Stripe. The button appears once the fee has actually been charged, so a card that was only authorized has nothing to refund. Two cases go through Stripe instead: the button is disabled once the booking date is more than 30 days in the past, and a payment taken on a Stripe account you have since disconnected is refunded from that account’s own Stripe dashboard. See refunds and payment problems on a booking for the full refund flow. How long the money then takes to reach the payment method the guest used is set by Stripe and the guest’s bank, not by Resos.
If a guest asks for their payment information to be deleted permanently from Stripe, these are the steps to do so:
- First, go to this link: https://dashboard.stripe.com/customers.
- Search for the guest’s name/email address.
- Go to “Payment Methods” on the bottom part of the screen.
- Click on the three dots and then on “Delete”.
See it in action
This short video covers the full online payment setup, from connecting Stripe to switching on prepayments and no-show fees:
What this article does not cover
This article is the setup. A few things it does not decide for you.
Whether a card can actually be charged. Stripe and the guest’s bank do. Some banks in Europe reject an automatic charge because of Strong Customer Authentication rules, so a fee is not guaranteed to collect even when everything here is set correctly.
Refunds and failed payments. See refunds and payment problems on a booking.
Anything inside Stripe. Payouts, account verification and disputes are handled in your own Stripe account, not in Resos.
An invoice for the guest’s payment. A no-show fee is a Stripe payment, not a Resos invoice. Resos does not produce an invoice or a tax receipt for it, and it does not appear under Menu → Settings & add-ons → Account → Billing → Invoices, which lists your own Resos subscription invoices only. When the booking has a valid guest email address, Resos asks Stripe to send a payment receipt after a successful charge, even if automatic receipt emails are disabled in Stripe. This receipt is not an invoice issued by Resos. The payment record itself sits in that same Stripe account: open it with the My Stripe Dashboard button under Menu → Settings & add-ons → Payment → Online payment. If your accounting needs a formal invoice for the fee, you issue it yourself. See how to set up Stripe.
Two limits are worth knowing before you set this up, because neither can be worked around in the settings. An opening hour holds one payment type at a time, so it can ask for a prepayment or a no-show fee, never both. And Reserve with Google does not support either payment type: guests can still book through Google, but they will not be charged, see the Reserve with Google FAQ.
If a fee did not charge, or you are unsure which opening hours your fee is live on, write to us at hi@resos.com with the date and the booking and we will check it with you.


