


How to add and manage tables and areas
In this article
- Choose your table assignment strategy
- Add and edit the restaurant areas
- The area form contains:
- New area not showing on the booking page?
- Let guests choose their area
- What your guests see
- Can guests pick a specific table or filter by a table feature?
- Add and edit the tables
- Where internal notes are shown
- Table combinations
- Duplicate tables to set up faster
- Reorder tables
- Deleting areas and tables
Table management must be switched on before you can add tables and areas. It’s a free feature included with every plan, not a paid add-on. If you have not activated it yet, go to Menu → Settings & add-ons → General → Tables, open More in the introduction at the top of that page, and click Activate.
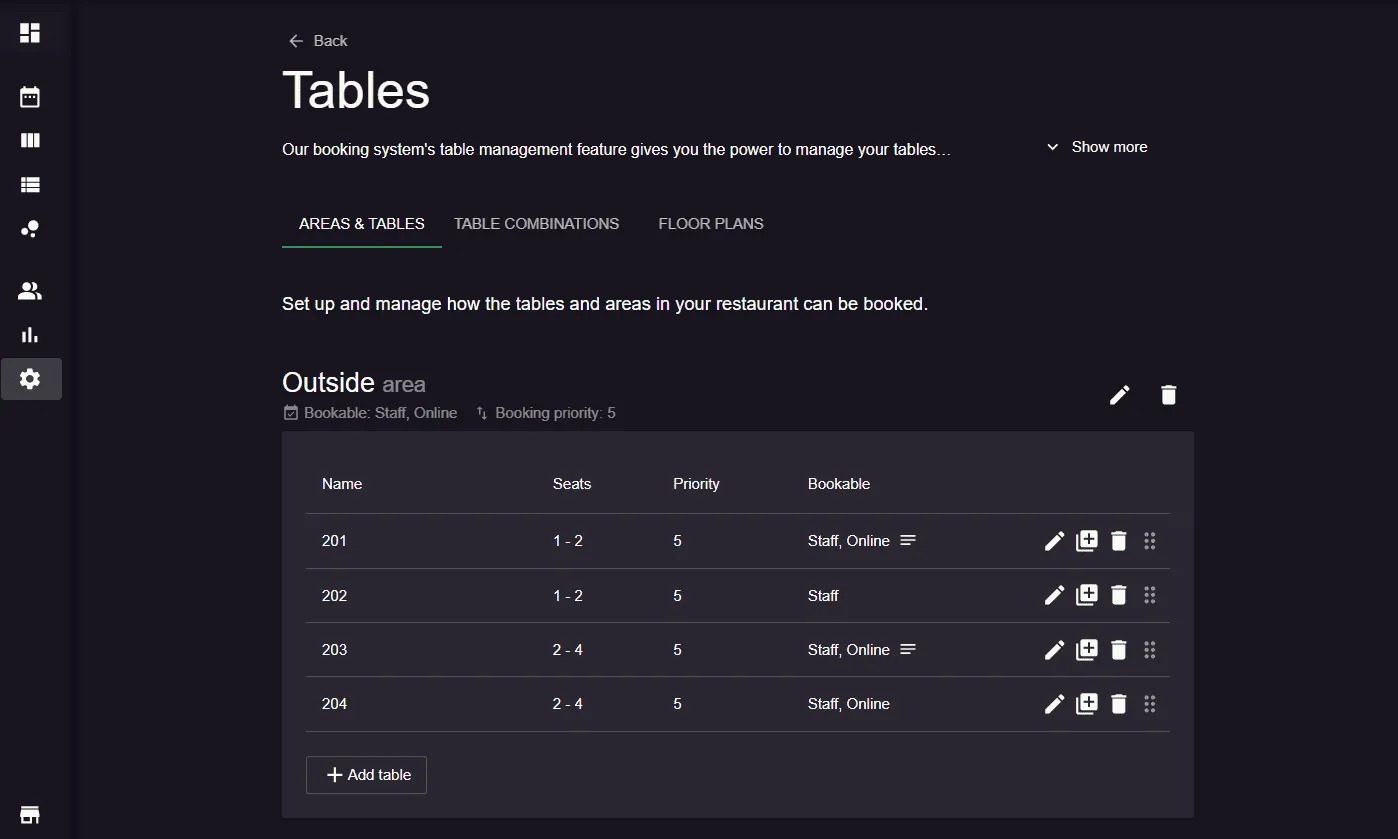
Once table management is on, the same Tables page is where you add areas and tables, and define how they can be booked, in which order (priority) they should be booked, for how many people, and if the tables can be combined. Let’s give it a try!
Choose your table assignment strategy
Before configuring your tables and areas, choose your preferred table assignment strategy by going to Menu → Settings & add-ons → Bookings.
You can choose between Optimized fit (default), which selects the best-fitting table for the party size, and Priority-first (legacy), which prioritizes the highest-priority area and table.
Once you’ve selected your preferred strategy, you can configure your table and area priorities as described below.
Add and edit the restaurant areas
In the section “Areas and Tables”, you can add the restaurant areas and tables to the system. Different areas can e.g. be the main restaurant room, the 2nd floor and an outdoor area. Start by clicking on the “Add area” button. This will then open the area form:
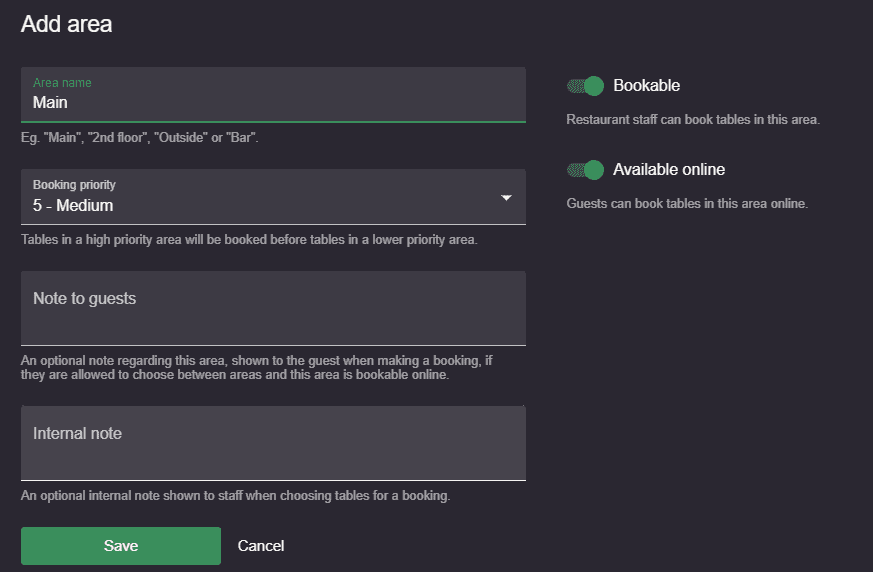
The area form contains:
- Area name: the name of the area.
- Booking priority: defines in which order tables in this area are booked compared to the other areas of your restaurant. Tables in a high priority area will be booked before tables in a lower-priority area.
- Note to guests: an optional note regarding the area, shown to the guests when making a booking, if they are allowed to choose between areas and this area is “available online”.
- Internal note: an optional internal note shown to staff when choosing a table in this area in the booking form.
- Bookable: if enabled, restaurant staff can book tables in this area. This setting overrules the bookable settings on tables is this area.
- Available online: if enabled, guests can book tables in this area online. Only possible if “Bookable” is also enabled. This setting overrules the available online settings on tables is this area.
Multiple areas can be added in the same way. After adding an area, it will be visible in the “Tables” section and you can easily edit it by clicking on the pen icon.
Read more about the table management feature and how to keep track of tables and available tables 
New area not showing on the booking page?
Check these two things before guests can book a new area online:
- The area itself is Available online. Open the area and check that Available online is on. It only works while Bookable is also on.
- Whether you set opening hours per area. Look at Define opening hours per area under Menu → Settings & add-ons → Bookings → Managing bookings → Areas. Most restaurants leave it off, and a new area is then covered by your regular opening hours with no extra step. If it is on, a new area is not added to your existing opening hours automatically: go to Menu → Settings & add-ons → General → Opening hours, open each opening hour that should offer the new area (default and any special opening hours), and tick the new area in the Areas list on the General tab. See how to set up default and special opening hours.
If the area is available online, has a table in it, and is covered by your opening hours, it still stays in the picker even when nothing is free for a specific date or party size - the guest sees the area listed and finds no available times when they open it, rather than the area disappearing. If an area keeps coming back empty like that, check whether a booking limit or table capacity on that opening hour is filtering out the times - see how to set up limits within opening hours.
Let guests choose their area
Normally a guest picks a time and Resos picks the table. If you want guests to choose the area themselves, turn on Allow guests to choose area.
- Go to Menu → Settings & add-ons → Bookings → Managing bookings → Areas.
- Switch on Allow guests to choose area.
- Save.
The switch stays greyed out until two things are true: Managing tables, on the same page, is set to Add table(s) to bookings automatically, and you have added at least two areas. That count includes areas that are not available online. Guests only get a choice when at least two areas are actually offered online, so with one online area Resos picks it for them.
What your guests see
With the setting on, the time step of the booking flow lists your areas instead of a plain list of times. The guest opens an area to see the times available in it. Every area marked Available online that still has a table in it is listed. With Define opening hours per area on, only the areas your opening hours attach to that date are listed. The list is not filtered by availability, so an area with nothing free for that date or party size is still shown; a guest who opens it sees the fully booked message instead of times.
The area’s Note to guests is shown inside that area, just above its times. It is the one place the note reaches a guest, so with Allow guests to choose area off it is never shown at all. If only one area is listed, Resos selects it for the guest and goes straight to the times, so the note is not shown then either.
Can guests pick a specific table or filter by a table feature?
No. In the online booking flow a guest never sees tables or a floor plan and cannot choose one. At most they choose an area, and Resos assigns the table. Tables have no attribute or tag, such as dog friendly or window seat, so there is nothing for the booking form to filter on. The floor plan and the table selector are staff tools, used when you book or seat a guest from the dashboard: see how to select tables on a booking.
To offer a group of tables as a choice, put them in their own area, named for what makes them different (for example “Dog friendly”), and switch on Allow guests to choose area as described above. Guests then pick that area by name. To keep a table from being booked online at all, switch off Available online on it: see how to block tables, areas and times from online booking.
Add and edit the tables
Tables are added to an area by clicking the “Add table” button in an area. Once clicked, the table form will open:
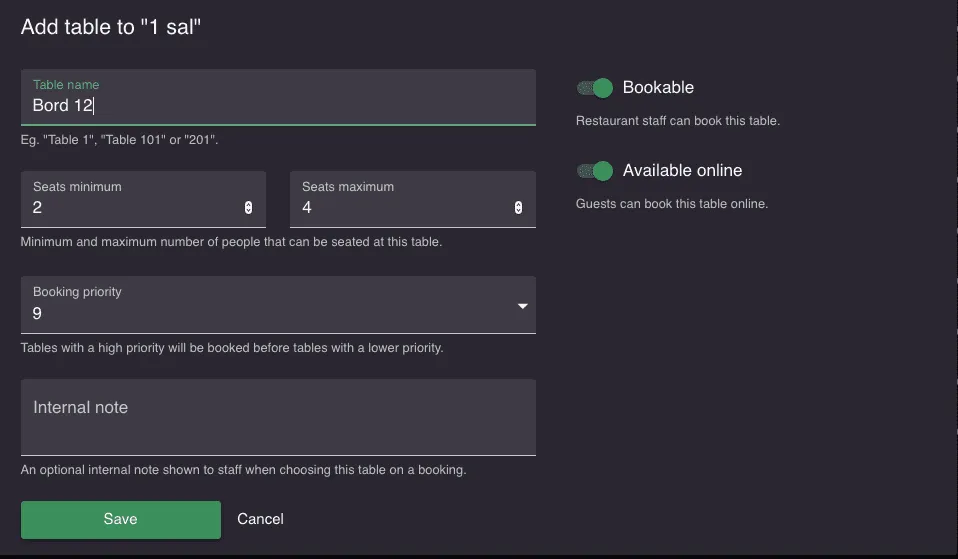
The table form contains:
- Table name: the name of the table, typically e.g. “Table 1” or “Table 21”.
- Minimum seats: the minimum number of people that can be seated at this table. The table will not be available for booking with fewer people than this number.
- Maximum seats: the maximum number of people that can be seated at this table. The table will only be available for bookings with more people than the maximum number if it is combinable with other tables - see how to set up table combinations.
- Booking priority: defines in which order this table is booked compared to the other tables in this area. Tables with a high priority will be booked before tables with a lower priority.
- Internal note: an optional internal note shown to staff when choosing this table in the booking form.
- Bookable: if enabled, restaurant staff can book this table.
- Available online: if enabled, guests can book this table online. Only possible if “Bookable” is also enabled.
A table can be edited by clicking on the pen icon on the right side of the screen.
Where internal notes are shown
An Internal note on an area or a table is for your team only. It is never sent to guests and never shown in the booking flow.
Staff see it in two places:
- On a booking. Open the booking and pick the table in the table selector. The internal notes for the tables you pick and for their areas appear as a line under the selector. A booking saved before the note was written carries the table details it was saved with, so deselect and reselect its table, then save, to bring the note in.
- In your table setup. Under Menu → Settings & add-ons → General → Tables, a note icon marks every area and table that has one. Hover the icon on an area to read its note; for a table, open the table to read it.
Area and table notes are not a column in the bookings list and are not printed with it. A note written on the booking itself is a different thing: it can be printed, by turning on Show communications in the print options, where it appears in the Booking messages & notes column. Keep anything the floor must read off a print-out on the booking, not on the table.
Table combinations
Joining two or more tables into one bookable unit for larger parties is its own topic - see how to set up table combinations.
Duplicate tables to set up faster
As we know that a lot of restaurants have many tables in the same size, we have made it easy to duplicate a table. Simply click the duplicate icon next to the table you want to duplicate.

If you have e.g. 5 tables that can have 1-2 guests, named “Table 10” to “Table 15”, simply create “Table 10” and click the duplicate icon and “Table 11” will automatically be added with the same settings as “Table 10”. Then click “Table 11” to make “Table 12”, etc.
Reorder tables
A table can be moved up or down in the list by holding and dragging the sort icon (6 grey dots) to the right of the screen.

Deleting areas and tables
Areas and tables can be deleted by clicking the trash icon to the right of the area or table. If an area is deleted, all tables in the area are also deleted.
Please be aware that any future bookings for a table that is deleted have to be moved manually to another table.

We hope that this guide about table management for your restaurant has been useful. If you have any questions, please do not hesitate to contacting us on hi@resos.com. See also the guide for how to select tables on a booking.


