


Get a simple overview of restaurant bookings
In this article
- Get an overview of your bookings with Resos
- Calendar, Schedule, List and Floor plan view?
- How do I cancel a booking from the dashboard?
- What do the New customer and Repeat customer icons mean?
- How are bookings sorted and counted in each view?
- Why do only some bookings show the opening hour name, such as Lunch or Dinner?
- What does the dashboard show for bookings?
- What are the different colors from the bookings?
To give you a clear and simple overview of restaurant bookings as well as the capacity at your restaurant, at any given time, we have implemented different ways to get a simple overview of your bookings. Get an overview of your bookings and handle reservations in the most efficient way possible. Change between Calendar, Schedule, List and Floor plan when managing bookings. Learn the difference below!
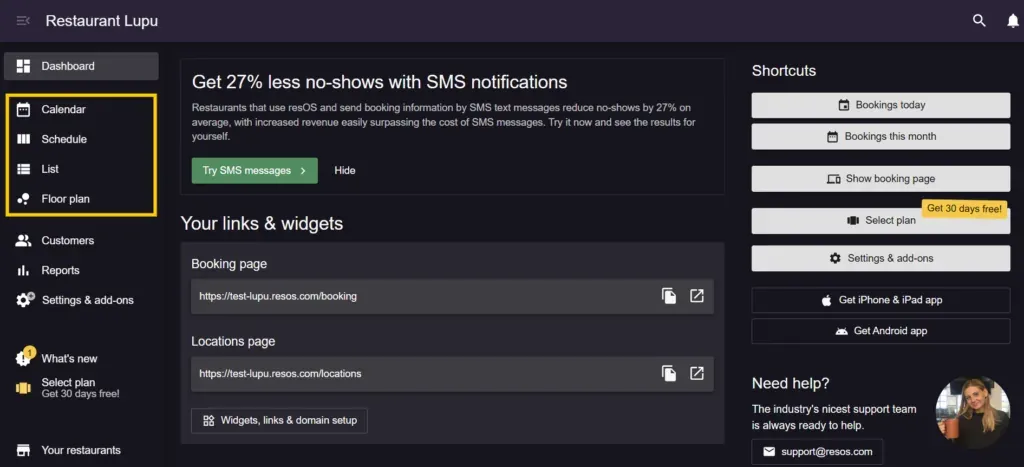
Get an overview of your bookings with Resos
Managing bookings has never been easier for your staff! With Resos’ booking system, you have the possibility of seeing any bookings made at your restaurant in different “views”. This means no more confusion for the staff, or between staff and the guests.
When you need a specific reservation fast, you can also look up any guest or booking with the in-app search instead of scrolling through these views.
Calendar, Schedule, List and Floor plan view?
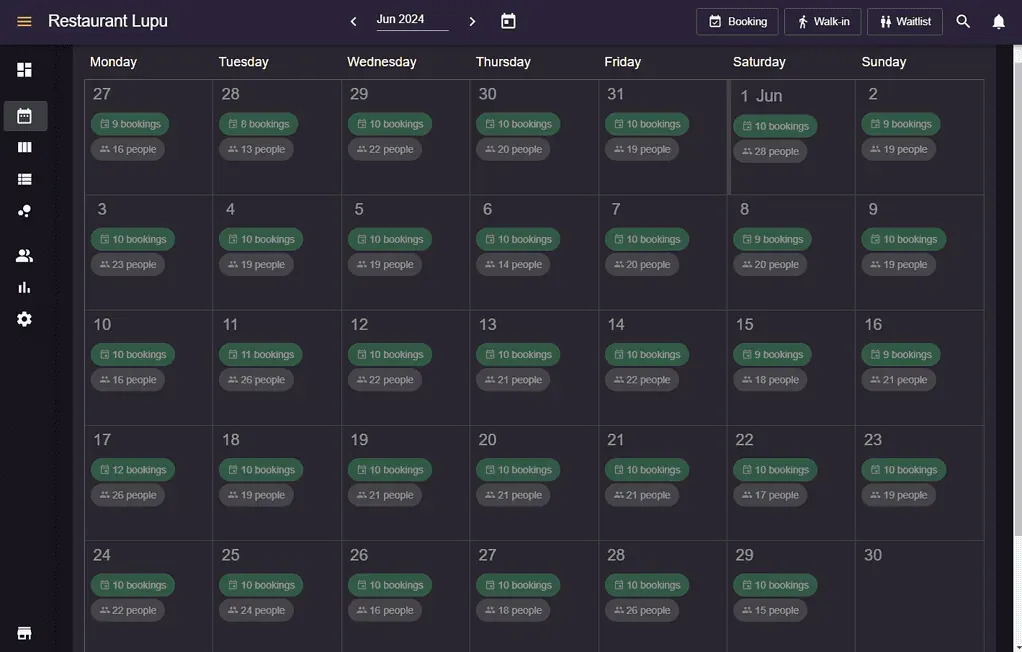
Calendar view: Get an overview of all your reservations for the month. You can see the number of bookings, guests, and the density of bookings for the month.
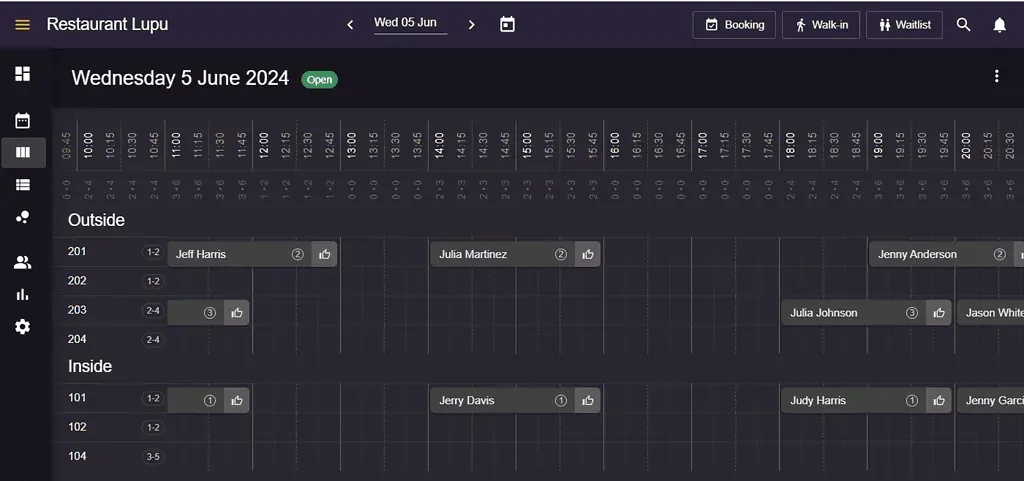
Schedule view: See the number of bookings and guests in the restaurant areas and the tables assigned to each booking. To give you an even better outline of your bookings and capacity at any given time, we have added a small line at the top of the bookings schedule view, showing the total number of bookings and people per 15-minute interval.
List view: Check out the list of all bookings made for the day, including guest details, booking status, internal notes, and prepayment status (if enabled). The List view also gives you extra tools to manage your day, such as a live booking timer that tracks how long guests have been seated or are waiting (it also shows on the schedule and on the booking details, and can be switched off in your settings), printing the booking list, adding notes, and closing bookings for a specific day or time interval. Read more about managing bookings in the List view in our articles on closing bookings for a specific day or time interval and printing booking views.
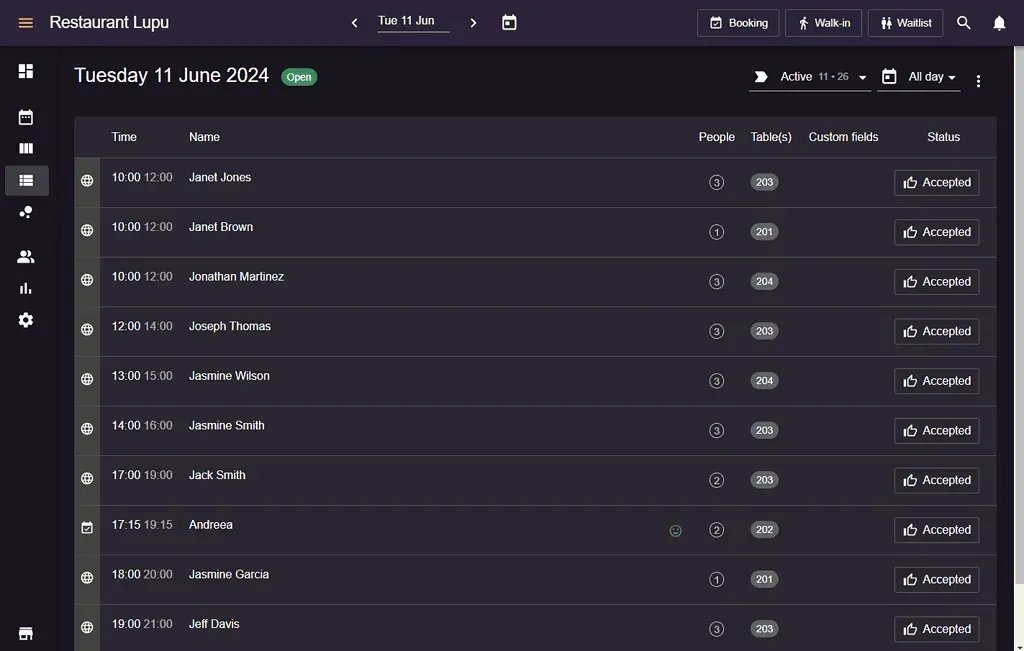
In the List view, an internal note you or your team added to a booking shows as short text right next to that booking, so you can read it without opening the booking. A message the guest wrote when they made the booking only shows as a small message icon; open the booking to read the message itself.
When you print the booking list, guest messages and internal notes are left out by default. Turn on Show communications in the print options to add a Booking messages & notes column that lists both, in the order they were written. Read more in how to print booking views.
Find a cancelled booking: The List view has a status filter. Set it to Cancelled to show only cancelled bookings, and open one to see its guest and booking details. If you want a total count of cancelled bookings for a period instead of an individual booking, see bookings reports. If a booking you expect is missing from both the active and cancelled views, contact us at hi@resos.com with the date, time and guest details.
How do I cancel a booking from the dashboard?
Open the booking and change its status to Cancelled in the status dropdown, then save. A message from a guest asking to cancel does not change the status on its own, so you set it yourself. If the booking has a no-show fee card on file and you cancel after the cancellation deadline, Resos asks whether you want to charge the guest. To find the booking again afterwards, use the Cancelled status filter described above.
What do the New customer and Repeat customer icons mean?
On bookings in the List and Schedule views you may see a small icon beside the guest. A New customer icon (a “NEW” badge) means the guest has no completed visit yet. A Repeat customer icon (a smiley face) means they do. Hover over the smiley to see their number of bookings and their latest booking. The booking form shows the same under the guest field: the text New customer for a new guest, or the smiley with the number of bookings and the latest booking for a repeat customer.
Resos counts a guest as a repeat customer when they have at least one completed visit other than this booking. A visit is a booking whose time has passed and whose status is not Declined, Cancelled, No-show, Deleted, Waitlist or Closed. A guest who only has upcoming bookings is therefore still shown as new. Resos recognises a guest by their email address or phone number, so a repeat icon can come from earlier bookings made with either.
There is no setting to hide or switch off the new customer icon.
How are bookings sorted and counted in each view?
List view order: The List view always shows the day’s bookings in order of booking time, earliest first. There is no option to sort by another column, and you cannot sort by the date a booking was created.
Guest totals: The Calendar view shows the number of bookings and the number of guests on each day. Cancelled, declined, no-show and deleted bookings are not counted there. In the List view, the status filter shows a count next to each status, as bookings and guests. If Show opening hour name on booking is switched on, each opening hour in the time filter also shows its count for the selected status. This gives you the guest total for the day, or for the status you have selected.
Filters: The List view has two filters. The first filters by status (for example Active, Seated or Cancelled). The second filters by time: All day, Rest of today or Until now. Rest of today and Until now are only available when you view today. If you have switched on the option to show the opening hour name on bookings, each opening hour also appears as a choice in the time filter, for example to view only dinner bookings. The Calendar view has no filters. If Show opening hour name on booking is switched on, each day also shows the bookings and guests per opening hour (not on small phone screens), but you cannot split the counts by party size.
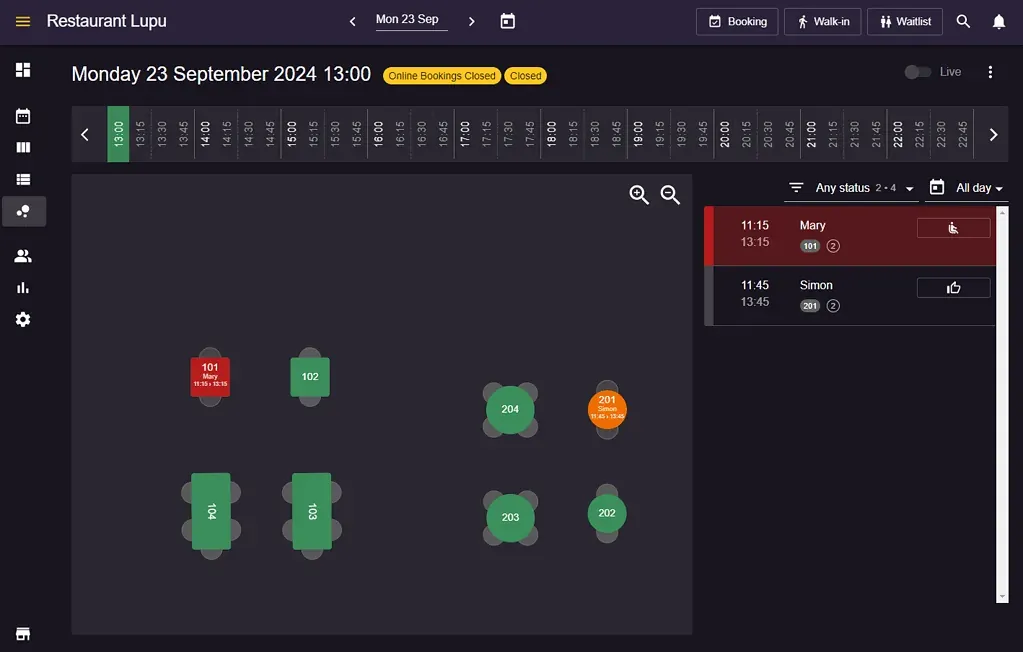
Floor plan view: Get an overview of your daily bookings based on the table layout of your restaurant. On the right side of the view, you can see the bookings in the form of a list and by clicking on different time slots, you can see the bookings assigned to the tables.
Why do only some bookings show the opening hour name, such as Lunch or Dinner?
The opening hour name appears under the guest name, written as “for” followed by the name (for example “for Dinner”), in the List view and the Schedule view. It does not depend on where the booking came from. A booking made online, added by your staff, imported or created through the API all follow the same two rules. A booking shows the name only when both are true:
- Show opening hour name on booking is switched on at Menu → Settings & add-ons → Bookings → Managing bookings. With it off, no booking shows a name in any view.
- The booking is linked to an opening hour that has a name. A booking is linked to an opening hour when it is made online, when it is made through the API with an opening hour or at a time inside your opening hours, when you choose one in the Opening hours field on the booking, or when Resos finds one that fits the date, time and area. Resos only picks an experience this way if Auto-select experience on booking is switched on in your experience settings.
If two bookings in the same list differ, open both and compare the Opening hours field. If you change a booking’s date, time or area, Resos checks again whether it still fits its opening hour and either switches to one that fits or sets the field to No opening hour. A booking linked to an experience is the exception: it stays on the experience until you detach it. See how to set up and share experiences.
To give every service a label, make sure each opening hour has a name under Menu → Settings & add-ons → General → Opening hours. A name you add or change later only appears on upcoming bookings; earlier bookings keep the name they had. Read more in how to set up default and special opening hours.
What does the dashboard show for bookings?
The dashboard has a Bookings panel with two fixed periods: Today, and Next 7 days. Each shows the number of bookings and guests. The periods cannot be changed to another length.
What are the different colors from the bookings?
You will notice that on all the views, you might have bookings with different colors, and you might be wondering what is the meaning behind these colors. Each color represents the status of a booking, and we’ve added this color system so that it’s easier for you to differentiate between bookings. Read more about this feature here.
Do you have any questions about how Resos can be used by your establishment? Don’t hesitate to contact our customer support at hi@resos.com and we will get back right away!


