


How to export data from Resos
In this article
Whether you need a backup of your guest list, a spreadsheet for your accountant, or a way to follow up on feedback, exporting your data out of Resos takes less than a minute. Here’s how to do it.
To find this feature, go to Menu → Settings & add-ons → Advanced → Export data. Exporting is available to owners, admins and users with the General settings right.
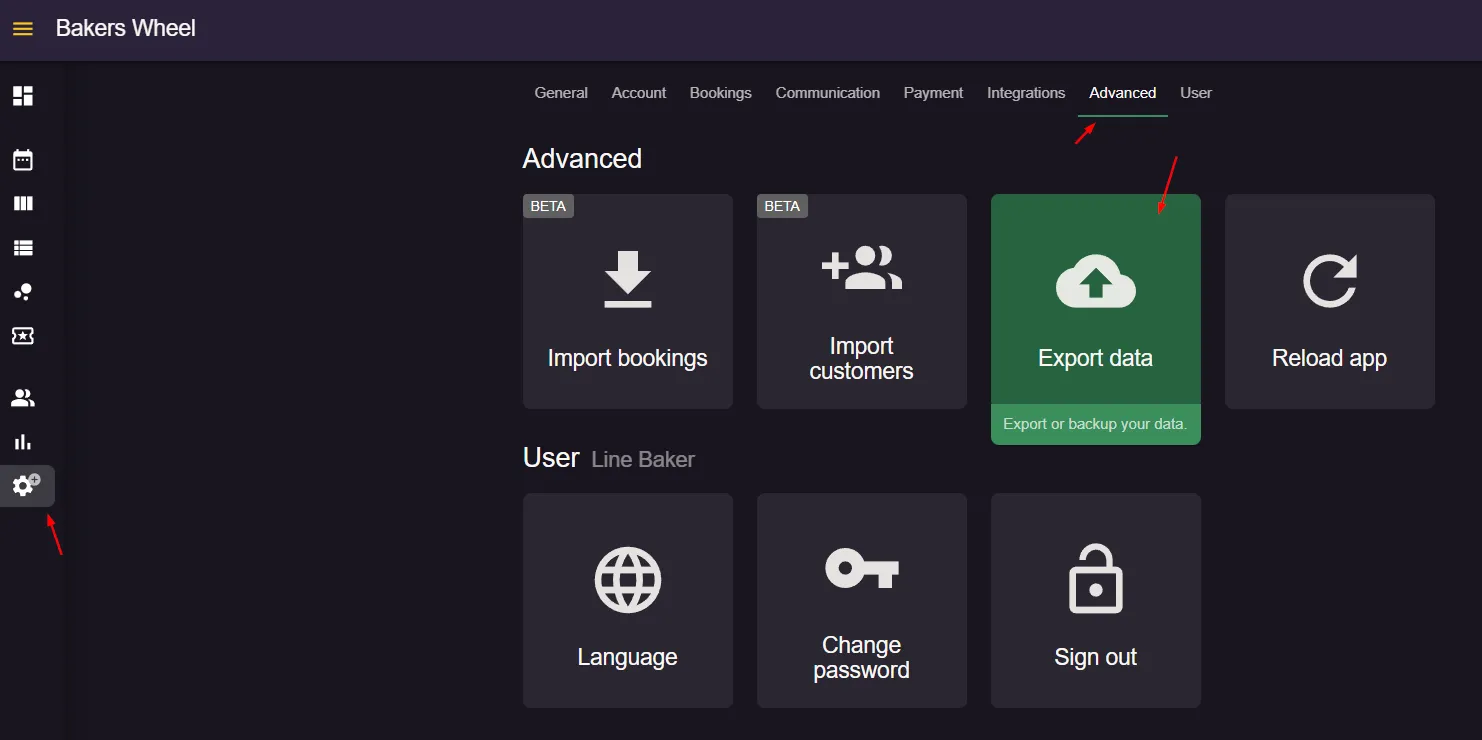
You can export three types of data: bookings, customers, and feedback. Each is downloaded separately as its own CSV file. You can’t export all three at once, and a single export can include up to 25,000 records. If your selection holds more than that, the export screen tells you how many records were included, so untick Export all records, narrow the date range and export in parts.
Choose one of the following data types
| Category | Fields included | Notes |
|---|---|---|
| Bookings | ID, date, time, duration, party size, table(s), area, status, source, opening hour, guest name/email/phone (plus notification preferences), payment type/amount/currency/status, comments, restaurant notes, timestamps, custom fields | Includes the guest’s contact details, so you don’t need the Customers export just to see who booked |
| Customers | Name, email address(es), phone number(s), company, address, tags, flag status and notes, created date | One row per guest profile, not tied to a specific booking |
| Feedback | Recommended (yes/no), ratings for atmosphere/food/service/value, written message, plus the linked booking’s ID, party size, date and time, and guest name/email/phone | Only shown for bookings where the guest submitted feedback |
Step 1: Choose a data type and date range
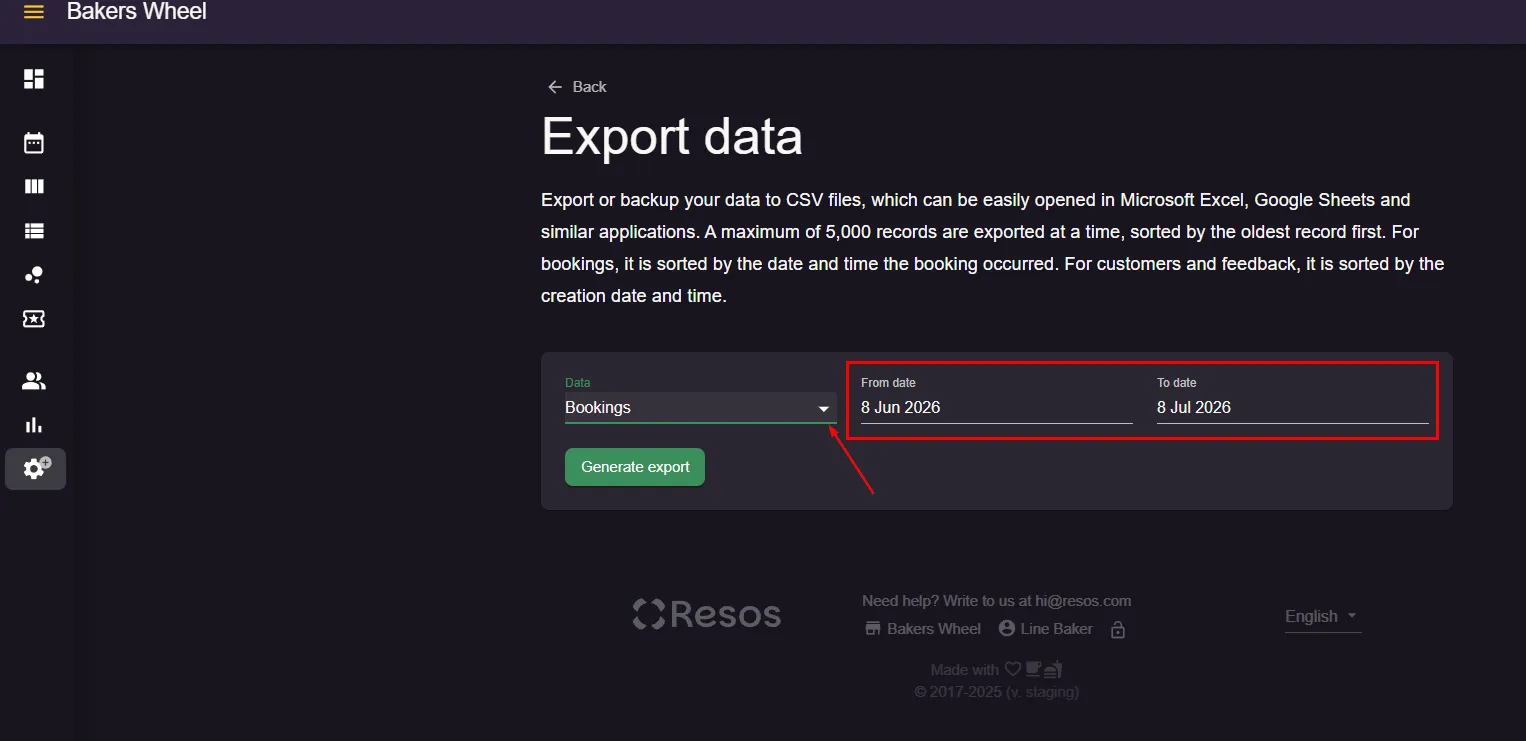
- Use the Data dropdown to select Bookings, Customers, or Feedback. Only one type can be exported at a time, so repeat the process to download the others.
- Select a period by setting the From date and To date values.
Step 2: Generate and download the CSV
- Double-check the data type and dates are correct.
- Click Generate export.
- Your browser downloads a .csv file containing only the data type you selected, for the chosen period.
Step 3: Open your file
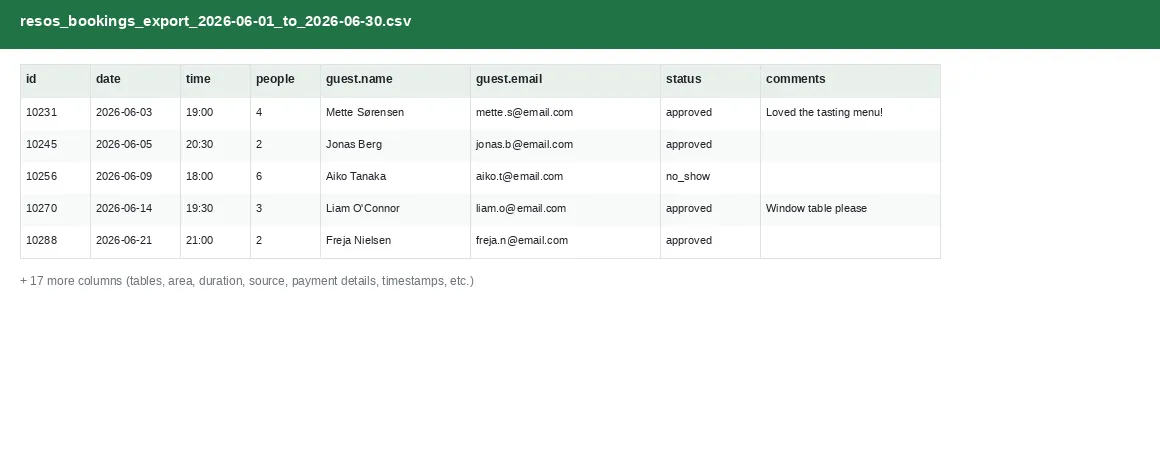
Open the downloaded file in Excel, Google Sheets, or Numbers. Columns are pre-labeled, so no cleanup is needed before you start working with it. Rows are sorted with the oldest record first: bookings by the date and time the booking occurred, customers and feedback by their creation date. Repeat the steps above with a different data type selected to export the other two categories.
How to find your most frequent guests
The Customers list (Menu → Customers) can only be filtered by tag. You cannot sort or filter it by number of visits, by booking status such as Has left or Cancelled, or by feedback, and the Customers export has no visit count. To build that kind of list, combine the Bookings and Feedback exports in a spreadsheet.
For a quick look on screen, Menu → Reports → Customers shows Top customers with 2+ bookings for the period you choose: up to 20 guests with two or more bookings, most bookings first. It counts bookings, not visits, so cancelled and no-show bookings are included. It shows no email or phone number and cannot be exported. See Customers reports.
To list your most frequent guests, for example everyone with 10 or more visits last year:
- Export Bookings for the period you want.
- In the
statuscolumn, remove the bookings that did not go ahead. The column holds a code for each status:canceled(Cancelled),no_show(No-show),declined(Declined),request(Request, never accepted),confirm(Pending confirmation, if it was never confirmed),deleted(Deleted),waitlist(Waitlist) andclosed(Closed). Bookings marked Has left show asleft. - Count the remaining rows per guest using the
guest.emailcolumn, orguest.phonefor guests without an email address. A pivot table or COUNTIF does this in Excel and Google Sheets. - Sort by that count and keep the guests above your threshold.
The export has no guest profile ID, so a guest who booked with two different email addresses shows up as two guests. To leave out guests who cancel often, count their canceled rows the same way and filter on that number.
To find guests who left good feedback, export Feedback. Each row holds the guest’s answer to Are you satisfied with your visit? in the recommended column (true for Yes), their ratings for food, service, atmosphere and value (empty if they did not rate), and their name, email and phone, so you can filter on any of them. The Feedback export’s date range follows the date the feedback was given, not the booking date.
Once you’re set up in Resos, you can just as easily bring data in the other way. See how to import bookings.
Please note: exported files contain personal guest information (names, emails, phone numbers). Store and share exports securely, and only export the date range you actually need.
Curious why other restaurants export regularly, and what each data type is useful for? See why export your data from Resos.
We hope you found this guide useful. If you have any questions about exporting your data or any general questions about Resos, do not hesitate to contact us at hi@resos.com. Our support representatives are excited to offer their help!


